
![]()
 MOVIE CAMERAS in general have a significant short
coming: they are so often difficult to focus visually, with
any great accuracy. The fact that a movie camera is a reflex
(i.e., with through-the-lens viewfinding) does not necessarily
give easy visual focusing. This is because movie lenses use
relatively short focal lengths, which inherently makes visual
focusing difficult. Yet the high magnification of the projected
image really demands very accurate focusing.
The various ways around this situation are well known,
and over the years most of them have been used in movie
cameras. Yet not until quite recently have any manufacturers
actually started marketing super 8 cameras with two-
window type rangefinders. The first models were introduced at the last Photokina exhibition in Cologne two years
ago, and they became available about a year later - long
enough to have proved themselves as a thoroughly useful
answer to focusing problems.
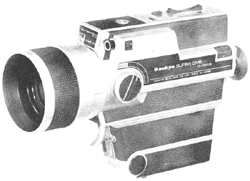
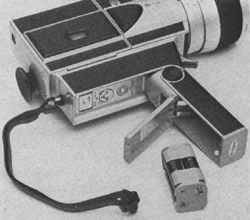
Sankyo now have four models with the two-window type
rangefinder: their Hi-Focus models CME 880, CME 660,
CME 440 and CME 330.
For our test report we chose the top model of the four,
with eight-to-one zoom, the excellent rangefinder system,
power-zooming, reflex viewfinder with f-numbers in the
viewfinder, film-running indicator, automatic exposure
control with manual override, a simple fade control, running
speeds of 18 and 36 f.p.s. and single-frames, fader device,
battery check systems, and the excellent hinge-down grip
which has been a feature of all the recent Sankyo models.
The CME 880 is priced at £199.95, while the other three
models are as follows: CME 660, £143.95; CME 440, £110.95; and CME 330,
£98.95.
MOVIE CAMERAS in general have a significant short
coming: they are so often difficult to focus visually, with
any great accuracy. The fact that a movie camera is a reflex
(i.e., with through-the-lens viewfinding) does not necessarily
give easy visual focusing. This is because movie lenses use
relatively short focal lengths, which inherently makes visual
focusing difficult. Yet the high magnification of the projected
image really demands very accurate focusing.
The various ways around this situation are well known,
and over the years most of them have been used in movie
cameras. Yet not until quite recently have any manufacturers
actually started marketing super 8 cameras with two-
window type rangefinders. The first models were introduced at the last Photokina exhibition in Cologne two years
ago, and they became available about a year later - long
enough to have proved themselves as a thoroughly useful
answer to focusing problems.
Sankyo now have four models with the two-window type
rangefinder: their Hi-Focus models CME 880, CME 660,
CME 440 and CME 330.
For our test report we chose the top model of the four,
with eight-to-one zoom, the excellent rangefinder system,
power-zooming, reflex viewfinder with f-numbers in the
viewfinder, film-running indicator, automatic exposure
control with manual override, a simple fade control, running
speeds of 18 and 36 f.p.s. and single-frames, fader device,
battery check systems, and the excellent hinge-down grip
which has been a feature of all the recent Sankyo models.
The CME 880 is priced at £199.95, while the other three
models are as follows: CME 660, £143.95; CME 440, £110.95; and CME 330,
£98.95. Construction. The CME cameras are well made, with a good standard of finish. Again, Sankyo use the silver-plus-black look, the silver being the glossy silver enamel on the die-castings which make up the body and door, while the black is the black leatherette panels recessed in on all sides. The result is a very workmanlike job. A touch of luxury is added by the soft leather panel on the door side.
The lens barrel is exceptionally large; approximately 3in. diameter on the CME 880. The mounting includes part of the rangefinder actuating mechanism, which accounts for the large diameter.
The handgrip, hinging down from the front part of the camera base, is convenient and comfortable to use. The grip contains four penlight batteries which power the drive and the meter system as well on the CME models.
To close the handgrip, you simply press the black button in the centre of' the hinge, and this releases the catch. If you want to use the camera on a tripod, you leave the grip closed, so that the front of the grip acts as the camera base. There is a standard 1-in. tripod socket near the front of the closed grip.
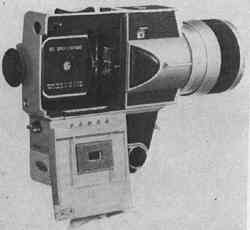 |
On the CME 880 you open the camera door by pressing in the black button the in top of the rear end of the body. The door hinges down for loading, leaving the cartridge chamber completely accessible. The door hinges down unobstructed even when the camera is on a tripod - always a convenient feature. |
On the CME camera, the loading door is quite differently arranged from previous versions of Sankyo super 8 models. Here, you press the door-catch button in the rear end of the camera, and the door hinges downwards. On some cameras with bottom hinged doors, you cannot load them while on a tripod, but this objection does not apply here because the bottom of the cartridge chamber is still well above the sole of the camera when on a tripod.
When the door is open, accessibility is excellent. As you press the rear of the cartridge in, it clicks into place with a satisfying positiveness. Then you simply close the door, and begin shooting. Sankyo CME 880.
There is the usual small window in the side of the door, for seeing if the camera is loaded.
Setting Of ASA speed is automatic, from the speed-notch on the film-cartridge.
The film-gate design follows normal super 8 practice, with the front plate in the camera, and the rear plate (the so-called pressure plate) being part of each cartridge.
The Sankyo gate is chromed for good frictional characteristics, and has the usual sprung edge-guides to control sideways weave. The claw is a ratchet type.
The camera is electrically driven, from four penlight batteries which are housed in a skeleton cartridge in the grip. All four batteries are used, on this model, to power the exposure control system, as well as the drive motor.
The normal running speed is 18 frames per second, and there is a slow-motion speed of 36 f.p.s. which can be selected at any time (even while running) by pressing down the '36' button in the top of the camera. The running speed is cross-coupled with the metering system, which compensates automatically.
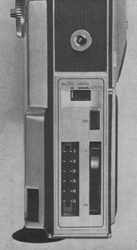
When you open the grip, you will see two white buttons in the base of the camera body itself. These are for testing the batteries and setting the metering system, and the two tests work with the aperture scale meter in the viewfinder.
To test the batteries you press the BATT CHECK button while looking into the view- finder. The meter needle should go well beyond the marker which is at f/5.6 on the scale. With new batteries, we found that the needle went over to about f/11, indicating ample reserve of power.
The second stage of the test is to press the other button, labeled EE CHECK, and to turn the coin-slotted surround of the second button until the meter needle is lined up with the marker in the viewfinder.
This is necessary to compensate out any variations in battery voltage, which might otherwise affect the meter system. We like this arrangement, since it also permits you to 'bias' the metering slightly one way or the other, deliberately, if you so desire for results slightly lighter or darker than 'normal'.
Note when replacing the batteries, that you must put the battery cartridge in the right way round. This is clearly indicated pictorially within the battery compartment.
You normally operate the camera by pressing in the release trigger below the lens. This is straightforward and excellent when hand-holding or in most cases on a tripod.
You can lock the camera either off (for safety in carrying), or on (for continuous running) by pulling up the small slider device below the trigger. When the camera is locked off, the metering system is automatically switched off, so preventing any slight drain on the batteries if the camera is put away for some time.
If the camera is set for lock-on running, the meter system remains on, of course. The lock-on setting is also used for remote control, for which you plug the accessory Remote Control unit into the 2.5mm jack socket in the rear end of the camera. Then the camera is locked on and the motor switched on and off remotely. This may give flash frames between shots, as with most cameras, but these frames can of course be cut out when editing the film.
There are two cable release sockets. One is alongside the release trigger, and this is for running the camera normally. We used this when the camera was on a tripod with a cable release from the pan-handle.
The second cable release socket is in the right-hand side of the camera, forward of the door. This socket is for single-frame shooting, and each press of the release will expose one frame of film, and as you let go the release the frame will be moved on. As with most cameras, you should not hold the release pressed for longer than necessary when on single-frame, because at the end of each frame the motor is virtually stalled and the current momentarily rises to a high value. In ordinary single-frame shooting this is unimportant, of course.
 |
Top of the CME 880 camera, showing the movie light socket with central plunger for filter actuation. The auto/ manual setting for the metering system has a lock position which enables the meter to be clamped for rough transport. The 36 f.p.s. button is clearly marked, and the zoom rocker is alongside the film counter window. |
On this camera the film-counter scale is in the top of the camera, and it is sensibly large - well over an inch long scale between 0 and 50ft. The scale is clearly marked at 10ft intervals, and you can see at a glance how much of the film has been used.
The pointer resets automatically to the starting position (the 0 end of' the scale) when you take the cartridge out of the camera. The counter is driven from the mechanism, and is clutched in when you put in a cartridge (by a plunger behind the top rear spring, in fact).
Note that the counter does not begin to indicate unless you put in a cartridge. You can test the counter by holding back the top spring in the cartridge chamber while you run the camera and watching the counter. Incidentally, the pointer moves smoothly, not with the two-steps-up-and-one- back motion used on some earlier Sankyo models.
Sankyo include on all the CME models the excellent film- running indicator used on the last of the pre-rangefinder models. This consists of a green pilot light, seen in the viewfinder below the field of view. The light flashes on and off as the film runs through.
In fact, the 'flashing' is due to the green signal being obscured by a flag which oscillates to and fro as the take-up core turns.
If the take-up stops - as it does at the end of the cartridge - you know immediately that the film is not running through any more. So this shows the exact moment that film runs out - an important point which some camera designers tend to overlook.
If the film stops, the green signal may be on or off, according to where the flag stops. Of course the pilot lamp only comes on when you are pressing the release of the camera, so there is no unnecessary drain on the batteries.
We like the film-running indicator and think that something of this sort should be compulsory on every super 8 camera.
The lens on the CME 880 is an eight-to-one zoom, going from 8mm which is a good medium-wide angle, up to 64mm which is a very long telephoto. The maximum aperture is f/1.8.
The lens may be zoomed either manually or by the power-zoom. The manual zoom is adjusted by a knob which is set in the left side of the camera (i.e. at 90º to the lens axis). We found this quite smooth, and just under a quarter of a turn of movement covers the range from wide-angle to telephoto.
This manual zooming knob is very convenient for setting the lens for non-zoom shots, and the scale is marked at 8-12-25-40-64mm to indicate where the zoom has been set.
The power-zoom is the type which is driven by clutching in to the camera drive mechanism. This means that you cannot rehearse the power-driven zoom unless the camera is running, though you can of course set up before you begin shooting, by using the manual zooming knob.
Power-zooming is by pressing one end or the other of the large rocker control in the top of the camera - while the camera is running. This mechanically clutches the zooming gearing into the camera drive, either in one direction or the other.
Clutching in the power-zoom adds only a very small extra load to the drive, and does not alter the running speed of the camera.
The rocker is arranged the logical way round: pressing the front will zoom in to telephoto, pressing the rear will zoom out to wide-angle.
Now we come to the most significant and indeed unique feature: the focusing.
First, the lens focuses down to 4 ft in the usual way by turning the front of the lens barrel. The markings, in feet (green) and metres (blue), are well spaced out around the large diameter barrel - covering some 90º in fact.
 |
Close-up of the two-window rangefinder. just above the zoom lens. In this picture, the right-hand of the two small windows is for the straight- through view, while the left-hand window contains the pivoting mirror which is coupled to the lens focusing cam. To use the rangefinder, you look into the viewfinder eyepiece and pull back the lens barrel to change from the viewfinder to the rangefinder. Then you adjust the focusing by turning the lens barrel until the two images are superimposed. Then you release the lens barrel and begin filming. |
The whole of the front part of the lens unit is the focusing ring, and it has a wide rubber finger-grip area which is important for comfortable handling. For on this lens, you pull back the whole of the front ring to change over from the viewfinder to the rangefinder. You see this by looking through the viewfinder eyepiece.
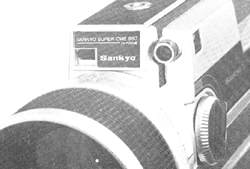
In the front of the camera, you will see two small windows above the zoom lens. These are the rangefinder windows, and they are about 1¼ in. apart (i.e. the 'base' length of the rangefinder is about 1¼in.).
You view the subject directly through the one window, while the other has a pivoted mirror behind it, and the view through this is combined with the straight- through view so that you see the two superimposed. Hence the name coincident- image rangefinder.
The focusing movement of the lens barrel is coupled internally with the pivoting of the rangefinder mirror, via a very accurate cam which controls the angle of the pivoting mirror according to the distance on which the lens is focused.
In use, you look into the viewfinder eyepiece and pull back the lens focusing barrel, turning it to bring the two rangefinder images of your subject exactly superimposed one over the other. The lens has now been focused on that subject, so you release the lens barrel, which springs forward again, changing back from the rangefinder to the viewfinder. You then shoot the scene.
Note that with this system, you do not have to put the zoom up to full telephoto, as on other focusing systems. Indeed, since the rangefinder is completely by-passing the zoom lens, you do not have to touch the zoom setting at all.
When you are looking through the range- finder, you will see that the right-hand side window image is yellowish. This greatly helps to differentiate between the two images as you turn the lens barrel to bring the two into superimposition.
Just one important point: you must hold the lens barrel from underneath. Otherwise your hand will obscure one or both of the rangefinder windows. Nearly everyone who tried the camera for us began by holding their hand in front of the rangefinder windows, and then complained they could not see anything through the rangefinder!
The through-the-lens reflex viewfinder gives a clear and bright image, very sharp in a sharp-edged frame. Superimposed along the bottom edge of the viewfinder frame is the scale of f-numbers, from f/1.8 on the left, to f/22 on the right.
The ends of the scale are red, indicating too little or too much light respectively. The position on the scale of f/5.6 is indicated by a small pointer which is the reference mark for setting the battery control on the meter system.
Apart from the scale of f-numbers, the only other thing you see in the viewfinder is the green film-running signal. The view is quite uncluttered, and brightness and clarity are good. The finder image is relatively large, the view being seen life-size at about a l3mm setting of the zoom, with relatively high eyepiece magnification.
The finder eyepiece is at the rear of the camera, positioned so that you can rest the upper part of the camera against your fore- head - especially if you use the camera left- eyed.
Eyepiece focusing is by a milled adjusting knob which moves the lenses internally - so that pressure on the eyecup cannot alter the setting at all (a good point). A flat rubber eyecup is provided, with an alternative one with side flap to exclude light for those who prefer this type. Spectacle wearers preferred the round eyecup.
A point about the rangefinder: the magnification is about 2.7-times, (which is about the same as the zoom at just over the 40min setting). The relatively high magnification gives very good sensitivity and makes the rangefinder very easy and accurate to use.
Sankyo were one of the first camera manufacturers to change over to TTL (through-the-lens) metering for all their models, and of course the CME models use this system. The CdS photocell in the upper part of the camera housing receives a proportion of the light through a perspex type light-guide rod leading up from the lens.
The amount of light on the photocell controls its ohmic resistance, and this in turn controls the amount of current passing through the moving-coil meter, and the greater this current, the more it stops down the two-bladed iris in the lens.
The novel point about this particular system is that it is fed directly from the same batteries that power the drive motor, but through a zener diode stabilising circuit and unique transistor-fed meter.
You simply set the meter system from time to time before shooting, by pressing in the EE TEST button and seeing if the meter needle in the viewfinder comes to the f/5.6 marker. If not, you turn the adjustment (around the button) with a coin, until the meter needle comes to the correct mark.
Advanced workers will appreciate the point that they could quite well set the metering system for slightly greater or less than normal exposure, according to individual preference, simply by setting slightly to one side or the other of the normal marker.
Doing away with the usual mercury batteries (used on the earlier Sankyo models) means one thing less to watch, and the standardising device here enables the user to check the exposure level of the automatic system whenever desired.
Setting of the ASA speed is automatic from the cartridge notch: there is a speed- reading earn in the front of the cartridge chamber, and the length of the speed notch controls how much this will be pushed in. This sets the ASA speed into the metering system.
Yet on this model, Sankyo have done an unusual thing: they have used only a three choice cam, and the notch-length steps are twice normal. So theoretically the ASA speeds are 40T/25D (both steps of cam pushed in by cartridge such as Kodachrome IIA), 10OT/64D (only one cam-step pushed in), and finally 25OT/160D (both cam-steps remaining out).
Yet Sankyo's instruction book claims speeds of 40/25, 100/64, and 4001250. This top speed setting is not in agreement with the Standard on cartridge notch length and ASA setting. Though there is no 160 ASA speed in the camera's metering system, you can in fact quite easily re-set the meter to cope with the 160 ASA cartridges. Instead of setting the meter needle to the red (f/5.6) mark when adjusting the 'EE-check', you set the needle to mid-way between f/5.6 and f/8. This matches the system to give the correct speed for the 160 ASA cartridges. Before reverting to Kodachrome or Agfa normal speed film again, you would of course set the meter needle back to the normal (f/5.6) position.
You can set the lens aperture manually for special shots where automatic metering would not give the best results. For example, we shot titles with white letters on a large expanse of black background, which any automatic metering system would tend to over-expose. We took a reading on grey card, and set the aperture manually on that reading.
The manual setting is mechanical, operated by the milled knob in the top of the camera. You set the aperture on the scale in the viewfinder. This is quite straightforward. You can see that the meter is on manual by the way the needle remains quite still in the viewfinder.
The manual setting knob also has a C position, meaning CLAMP. This simply clamps the meter movement for transport (e.g., if you ever send the camera through the post, the meter should be clamped to prevent the iris blades swinging about).
As on the earlier 880 model, there is a simple fade device which operates mechanically on the lens iris.
For a fade-out you slowly press down the fade slider knob (right-hand side of camera, just forward of the door). This mechanically closes down the lens iris from its automatic setting to fully closed.
For a fade-in, you start with the slider pressed down, and let the slider slowly come up as the camera runs. You have to be rather careful to maintain a smooth movement of the fader lever, and you can watch the meter needle in the viewfinder to see the action.
Like all iris fades, this works best when you start from a relatively large aperture, so that there are several 'stops' of aperture to fade through.
The CME cameras have the usual super 8 provisions for using Type A (indoor) film as a universal material, with the built-in orange filter in the lens for daylight shooting.
When there is not enough light for filming in daylight, you screw one of the super 8 movie lights to the top of the camera, switch on the lamp, and carry on shooting. The movie light fitting in the top of the camera is the common Jin. screw socket, with central plunger which effects removal of the filter from the lens as the movie light is screwed on. The filter factor is allowed for automatically.
If you were to use a non-Type-A cartridge (which would have no lower notch), the cartridge would itself automatically remove the filter from the lens, without making the filter factor speed change. This is correctly in accordance with the super 8 system.
We like the coincident-image rangefinder very much indeed. We tested it first by setting up the camera at three metres (nearly 10ft) from the subject (a test chart), measuring from the film-plane about 5mm aft of the front of the door, in fact. Then we used the rangefinder to set the focusing of the lens. This indicated exactly three metres on the scale. We repeated the rangefinding ten times, and every time the result was within about lin., which is very close - far closer and more positive than with the usual microprism and other systems of visual focusing. We also checked the infinity and 5ft positions, and these too were correct.
The important point about using the rangefinder is this: it is completely independent of the setting of the zoom. So you do not have to alter the zoom, when you want to check your focusing. This is a great practical advantage in our view.
When you start to use the CME camera, you must learn immediately to grip the lens barrel from underneath. Otherwise your fingers will be in front of the rangefinder windows, and you won't see anything of the subject in the viewfinder.
The CME rangefinder is, of course, of the 'either-or' type, and when you pull back the lens barrel you change over from the view- finder to the rangefinder. The changeover in fact takes place in the viewfinder system, and does not affect the film. So if you really wanted to, you could change to the range- finder while shooting - though of course you would lose the normal viewfinder image because you change the eyepiece over to look through the rangefinder.
We stress: the rangefinder is sensibly arranged with adequate magnification (about 2.7 times) for very good sensitivity.
 |
Door side of the camera. The grip hinges down for convenient hand- holding, this very practical design has been a feature of all the Sankyo models for the past few years. Note the large diameter lens barrel which contains the switch -to -rangefinder mechanism: you push back the barrel to change from view finding to range finding. In the side of the camera is the fade slider device. |
We tested the lens by shooting both test charm and practical subjects. We liked the long range (eight-to-one) of the zoom, and the very accurate rangefinder focusing allows you to make the most of it by giving accurate focusing to make the most of the lens performance especially at or near the telephoto end of the range where depth of field is critical.
Definition was in the very good class through most of the range, only the absolute maximum aperture showing the merest trace of softness as would be expected. By two stops down (f/4) definition was really excellent, and contrast was high. This continued down through the aperture scale until the inevitable diffraction took over at very tiny apertures, say around f/16 or smaller.
Our tests showed that the eight-to-one zoom lens transmission is a shade on the yellowish side of neutral, but only to a very small degree -rather less even than a CC05Y filter. This degree of difference from dead neutral would never be noticed unless you tested several different makes and types of lens together.
One point about the lens is not immediately obvious: it can in fact take a 55mm screw-in filter, provided this is of the 'slimline' pattern made by several manufacturers. The filter screw thread is well up inside the lens barrel, on the front of the lens itself, and not on the front (outer) ring which moves to and fro to actuate the rangefinder/viewfinder changeover.
We might mention that some of those who tried the camera for us said they thought the green-filled distance-in-feet markings were rather light in colour and would have been more visible if the green had been darker. This is a small point, however.
We checked the accuracy of the viewfinder, and found it to be good: well centred, and within about two per cent of correct on all four sides. Our test camera showed slightly more on the screen, than bad been seen in the viewfinder at the time of shooting, the amount being just about two per cent of picture width and height, almost perfectly centred. This is satisfactory, and it is good to see the better camera manufacturers at last giving up the earlier practice of having plenty of 'safety margin' which is really quite unnecessary in the very clear reflex type viewfinder.
The viewfinder image was very good for sharpness and clarity, and one of the advantages of the rangefinder is that the accuracy is quite independent of the eyepiece setting.
 |
Battery system on the CME camera. Four penlight batteries are used to power both the drive motor and the metering system. These batteries are carried in the skeleton holder, which fits into the grip handle. Note the two battery test buttons in the base of the camera. The one nearest the grip-hinge is for testing the state of batteries, while the button with the coin- slotted surround is pressed when standardising the sensitivity of the metering system. Attached to the back of the camera is the wrist strap which carries the type A filter removal screw on the end. |
The CME 880 ran quietly and smoothly, and the trigger release action was good.
We checked the current taken from the batteries, and found it to be about average: about 150mA without film and about 25OmA with film, rising very slightly during a power-zoom (by 50mA while zooming, and by about 90mA at the end of the zoom but keeping the rocker pressed down).
On single-frame, the current rose to a high value at the end of each exposure while the cable-release was still pressed. Thus the cable-release should not be held pressed for longer than needed on single frames.
We checked the amount of current being taken from the batteries by the metering system. This was around 2.5mA, rising slightly to 3mA in bright light. This is only a small drain, but obviously it would have an effect on the batteries over a long period. So you should always remember to turn the camera off before putting it away for any great length of time.
We checked the running speeds on our test camera, and found them to be closely set to the nominal 18 and 36 f.p.s.
Though the CME 880 is fairly heavy for a super 8 camera (it weighs 3¾lb), it balances well in the hand and is very pleasant to use.
On a tripod, the camera - with grip closed - is slightly nose-heavy, though not seriously so. The only point noted in our tests with the camera on a tripod was that slight slackness was found in the hinge- joint of the grip when aiming the lens vertically downwards.
We liked ... the rangefinder, which answers one of the most significant practical problems of zoom movie cameras today ... the versatility of the camera ... the high standard of workmanship and finish ... the simple user-adjusted set-up of the metering system ... the excellent handling qualities of the camera ... the very good results.
We didn't like ... the fact that the power- zoom is only of the clutch-in type, which does not allow you to rehearse a power-zoom without running the camera; you can however use the very convenient manual zooming knob.
With the introduction of the Sankyo rangefinder, we have one of the most significant practical advances in movie cameras for many years. There is nothing really new about a coincident- image rangefinder, of course, but until the Sankyo CME models, nobody has put one into a commercially available camera.
The advantages of the rangefinder are its accuracy and convenience, for you do not have to alter the zoom to check the focusing.
On the CME 880, it is also interesting to note that Sankyo have completely re-designed almost everything on the camera, compared with the earlier non- rangefinder CM 880. The result here is a very thoughtfully designed camera with attractive and workmanlike appearance And - though it is not a lightweight model - it has excellent handling qualities, thanks largely to the convenient hinge-in grip and well-placed controls.
Here indeed is an excellent and very practical movie camera, and we have no hesitation in recommending it.
(Sankyo camera submitted for test by David Williams (Cine Equipment Limited).)
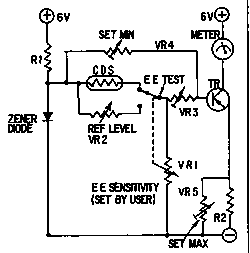 Here is Sankyo's novel meter
circuit used on the CME
cameras.
Here is Sankyo's novel meter
circuit used on the CME
cameras.
A zener diode, fed through resistance R 1, is used to provide a stabilized voltage supply to the CdS photo resistor. The amount of light reflected from the subject controls the ohmic resistance of the CdS cell, and this resistance together with the resistance of EE Sensitivity resistor VR 1, forms a voltage divider.
The voltage at the junction between them depends on the amount of light on the cell and the setting of the EE resistance VR 1.
The voltage at the junction of these two resistances is fed as bias to the base of the transistor, TR and this in turn controls the amount of current flowing through the transistor and thence through the moving coil meter movement that controls the iris blades.
The circuit has clever refinements which permit the system to be set up accurately in the factory. Resistor VR4 sets the minimum current through the meter (large aperture end of the scale), while VR5 sets the maximum deflection (small aperture end of the range). Resistance VR3 adjusts the 'law' of the system, to cancel out variations between different CdS cells.
The EE Test button allows you to switch over from the CdS cell to a standardising resistor VRZ for adjusting the meter system to a standard deflection (and hence standardised sensitivity level) before shooting.
![]()

This page was last updated 02 Dec 2002